Saturday, July 8, 2017

Boxy Lace

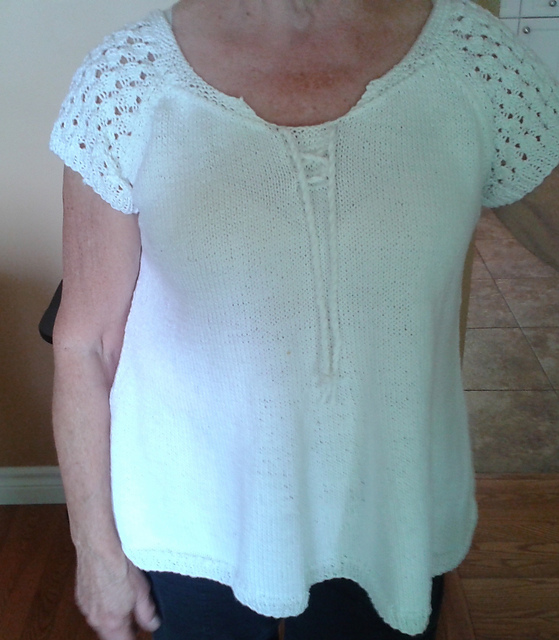
This is the year to reknit my knits.  Or so it seems.  Earlier this spring, I re-knit the Black Zooey, changing it from it's first life as Margarita to it's new and happier Vonica.  More recently, I ripped out my Cotton Concerto  - sorry to Sigrun  who helped me so much with the sleeves - and knit Cancun Boxy Lace.


From the photos it appears that my Concerto looked lovely on me.

But in reality all that cotton was a bit heavy, and therefore hot, to wear.  Cancun used only a fraction of the amount of yarn needed for Concerto.   Combine that with the  shorter length and Cancun  should be much more comfortable to wear on hot summer days.

Cancun is an easy knit, but the free ravelry pattern does have a few errors.  Nothing major and nothing  a knowing knitter  cannot solve,  but just beware.  And use the picture for guidance.


I have worn Cancun a few times this week and it has been well received.  The proof is always in the wearing.

Sorry for these less than stellar photos.  Hubby is off on a fishing trip and these are selfies.  Should get some advice from our PM.  He's well-practised.

Tuesday, June 20, 2017

Happy Birthday Canada

I know, I am a bit early with my birthday wishes for Canada, but I just finished my Maple Leaf Shawl.
Knit in   Briggs & Little Sport weight in a bright red colour, what could be more perfect for my 'Canada 150' project than a shawl in the shape of the iconic Maple Leaf, knit in Mountie Scarlet, with yarn produced at the Canada's oldest  mill?

Hopefully, our cool spring weather will be with us still on July 1st and I will be able to wear my shawl to show off my true north Canadian spirit.

Pattern: Maple Leaf Shawl
Needles: 5.5mm
Yarn:  Briggs & Little Sport weight.  Colour -  Scarlet
Mods:  None.  The pattern tells the knitter to pick their favourite edge stitch and use it whenever the pattern says ES (Edge stitch). I chose to slip the first stitch of every row.  That produced a very nice chain effect along all the points.

After knitting, I soaked the shawl in Eucolan then tossed it in the dryer for 7 minutes. Thanks B&L for your tough yarn that does not exhibit  extreme felting properties.  The dryer simply tightened up the stitches so they are all neat and tidy.  To finish the drying, I pinned the shawl to the blocking board, paying particular attention to all the points.
They now sit very sharply - just the look I wanted.

This is not a shawl I see myself wearing much, but I am glad I knit it.  It was fun to do and will make a  yearly appearance on Canada Day.


Monday, June 5, 2017

For Florida

Many times in my knitting life   -  and my  non-knitting life too, come to think of it  -   I have heard ladies say that the shawl, the shorts, or the sun hat they are wearing was purchased with Florida in mind. Usually older ladies.  Retired ladies with the time and the funds to head south in the winter. Now, seems as if  I am one of them.

One of our winter rituals, while in Florida,  is to head to the movies on Fridays.  Dinner and a movie. Only in  reverse order as we go to matinee followed by dinner. No matter the temperature outdoors, the movie theater often seems to be chilly.  As do the restaurants.  My Florida friend, Ruby, is always prepared for those cooler temperatures.  Slung over her arm or  carried in her purse, she comes prepared with a shawl.  Something to slip over her shoulders to protect her from the manufactured breeze when the A.C. kicks in. Percolating in my mind last winter was the thought that "I want me one of those."

Back home,  one rainy, cool,  April day a friend and I headed over to Hanover  to check out a new yarn store.  Lama Laine.  There on the first set of shelves inside the door was a great display of Baby Bamboo.  With glorious  Florida colours.   A Florida shawl waiting to happen.  I picked up two balls - one blue and one green  - that to me,  said FLORIDA!

Back home I canvassed Ravelry for  the perfect pattern.  I wanted either triangular or semi-circular.  Not a rectangle.  Mostly because I didn't want to have to pin it on.  My vision was of a shawl that would stay put without a shawl pin, because of it's shaping.  The Kindness Shawl caught my eye and although my yarn was much thicker than the Fingering weight called for in the pattern, I felt it was do-able with the DK weight.

As luck would have it, I had one complete skein of White Sunseeker left over from my recently-completed Vonica.  With 217 Metres of the white and about one hundred each of the Bamboo, I have a perfectly-sized shawl.  With a perfect, crescent shape that sits just beautifully on the shoulders and doesn't slip off.


When the winds howl and snow flies next fall,  some might be thinking of flannel PJs and woolen toques, but

I'll be thinking Florida shawl.


Wednesday, May 24, 2017

Vonica In White

Vonica is just as nice in white as it is in black.


 Having  finished the black one in mid April, almost immediately, I cast on for a  white one.  While the motivation to speed knit  lessened with Vonica number two, still today, May 24, my white Vonica  is enjoying it's inaugural wear.

The yarn used this time is Cascade Sunseeker, a 50/50 cotton acrylic blend.  It was warm across my lap while knitting and it occurred to me that the acrylic content might make it  too warm for a hot weather wear.  I sure hope not because when else would one wear a white lacy sweater but in hot weather?


Again, the only modification I made was to use 2x2 ribbing vs the 1x1 called for in the pattern.

As I mentioned after finishing my black Vonica  - and as has been born out with each of it's  many, many wearings -   Vonica is  an easy pattern to knit; a comfortable sweater to wear; - and one that garners compliments galore.  

I have begun to wonder if it would be 'weird' to have a sweater collection that contained only Vonicas?  Perhaps to a non-knitter, yes.  But this knitter is considering it.

PS.  I am having a much better day that my photo in these pics might suggest.

PS #2 Bonne Marie from Chicknits has publicly announced on Ravelry that she is suffering from Colon Cancer.  Hop on over to the Chicknits forum and wish her well.


Wednesday, April 26, 2017

From Margarita to Vonica

From Magarita to Vonica - sounds like a song title.  But no, it is my latest knit.

Last year you might remember that I knit Margarita with Black Zooey - a linen/cotton combo that I purchased  in Florida.  Although I loved the lace panel down the back of Margarita, I didn't love the way the sweater hung in front.  It was one of those 'stick to the armpits' sweaters.  The pattern declared it to be open-fronted but gave instructions for extra width to fill in that gap a bit, if desired.

I did knit it with the extra width, but still, when wearing, it drifted always to the armpits and stayed there.


This spring, I decided to rip it out and knit something else with it.  I chose Vonica, a Chicknits pattern.


I have knit a few other Chicknits patterns and even though Vonica is also open-fronted, I felt I could trust the designer to give me a non-armpit-clinging garment.  And she did!
It is a lovely sweater.  And a quick knit. Started April 1 - good thing I'm not superstitious - and finished on April 23.

The construction is unique.  It starts at the centre-back collar with a provisional cast on (See how I did this on  my ravelry page)
 and continues first down the fronts, then the back to the underarms.  There the  fronts are joined to the back and the knitting continues to the bottom ribbing.


Sleeves are picked up and knit down.  Sleeves are a modified drop
 with a snugger fit that the drop-shoulder sleeves of our past. They look very sophisticated.

The only modification I did was to use 2x2 ribbing instead of the 1x1 the pattern suggested.  I made my standard size - the 40 (W)x 22.5(L) inch rectangle that seems to suit my body shape.  I love it so much, I think a white one is in order.


Wednesday, January 25, 2017

Canadian Recognition, Eh?

Yesterday, while out thrifting for bargains with my friend, I was spotted by a fellow Canadian.  I was searching through a packed-full rack of clothing and made a comment to no one in particular -   'These clothes are packed tight, eh?'

Immediately a woman standing a few feet away, spoke to me and asked where I was from.  'Canada,' I replied.

'Well, I know that,' she said.

When I asked her how she knew that, she repeated  -   'These clothes are packed tight - eh?'

My eh gave me away.   That is how I met Pat.  Pat from Peterborough and I had a nice chat about things back home. She was tickled to know my sister lives in Peterborough.

I never know whether to 'eh' away as my natural inclinations prompt me to do, or to  try to  improve my speech patterns.  But with the 'eh' you meet some nice people when away from home.

And knitting?  Well, not much, I had to buy a new needle.  My 16 inch cable just wouldn't cut the 154 stitches in this thick yarn.  With a new 29 inch cable,  the afghan is underway. It will be very pretty, I think.

Thursday, January 19, 2017

Warm-Weather Knitting

Warm-weather knitting.  You would think that is what I would do in Florida.  But - Florida knitting, for me, is different  from  at-home, warm-weather knitting.  It seems, Florida destroys my motivation to knit.  Last year the big plastic tub of yarn and patterns that accompanied me on the trip, went mostly untouched.  Knowing that, this year I came with only three projects.

One is a hank of Orange/red mohair that is intended to be  a Hemlock Ring Blanket.

The second is my black linen Margarita.  It's open-front design is too open for my taste, so I hope to rip and re-knit it while here.  That most likely will fall under the 'hope springs eternal' category.

And the third project is a bag with a variety of wonderful, fluffy, textured, green yarns.  A gift given to me by a dear friend almost eleven years ago now.  The clear bag, filled with the wonderful yarns,  has been sitting on my shelf all those years.  I look at it, admire it and think of my friend whenever I look at the bag.  But I have decided it is time.  After eleven years, it will no longer be a work of art on my shelf, but a work of art on my bed.  An afghan.

We've been here four nights and so far, I have rolled the skeins into balls and cast on.

It's a start.

Wednesday, January 11, 2017

Sleeves Complete

There was miserable weather, a long list of errands to run, plus book club in the evening, but  the cuff of sleeve number two of Not Just A Red Neck is finished.  As  do-able in a day as I thought.

Here are both sleeves, finished except for the weaving-in of ends.


The sharp eyed amongst you will notice that one  cuff is narrower than the   other.    After finishing cuff number one, it seemed a bit wide.  For cuff #2, I decided to decrease a few extra stitches in the last row before knitting the multi-coloured cuff.  Of course, this would require re-knitting one of those cuffs once I chose the favoured one.   And so it is.

Cuff #2, the narrower cuff,  is the one I like best.  Come April, when I intend to  finish this sweater, I'll rip out the wider cuff and re do it to match the preferred one.

Good thing targets are adjustable.  NJAR is not finished but close enough that I feel good about a quick finish when we return from our winter in the South.  With that closing statement the computer  is getting unplugged and packed away.  I'll return once I figure out the Wifi in our Florida accommodation.

Tuesday, January 10, 2017

Not Just A Red Neck.

Having finished my treatise on fit, I can now give you a post about current knitting.  Including a picture.

 If you recall, I started a sweater over Christmas that I hoped to have completed before heading south.  It is my new, wear-around-the-house sweater.  When starting to type this morning, I thought - This sweater needs a name.  Instantly 'red neck' came to mind because of the red in the yoke. But then, the neck also has green,  purple, white, and yellow.  So Not Just A Red Neck it will be.

Today is my last day of regular knitting, before  wool gets moth-balled for warmer-type, Florida fibres. (Maybe I should say Florida Fibers.  When in Rome, you know.)   So is Not Just A Red Neck finished?  Not quite.


Not knowing if I had enough tweed yarn to finish the sweater,  I had stopped knitting the body just shy of the lower trim and started the sleeves.   If need be, I knew I could put a deep,  multi-coloured  piece along the sweater bottom if yarn was short.

Knitting with the tweed, I finished sleeve number one.  Number two just needs a cuff.  That's is do-able today.

All that will remain then, for spring knitting, is to finish the lower body, steek the sweater and add some front button band trim.  Type of trim to be decided once I have steeked and tried on the sweater.  It will tell me what kind of trim to use.

I like it.  The bright colours at the neck line make what would be a dull sweater, pop.  It will be fun to wear.

PS.  Yesterday a comment appeared on the blog about fit.  It asked  if there is not nice fitting cardigan in the wardrobe to measure, is it OK to measure a tee shirt and use those measurements to knit a cardi?  Not sure whether this was meant to be a LOL question but I refer you to this post.

Monday, January 9, 2017

What Does Your Gauge Say?

Trying to help knitters knit sweaters that fit is all for nothing if gauge isn't part of the calculation. Gauge is something the knitter has to 'get'.  Both on the needles and in the head.  And there are so many knitters who do not get gauge.  Oh the stories I could tell.

Like Knitter  A,  who asked a fellow knitter what size she  knit because Knitter A  wanted her sweaters to fit just as nicely.  As if the size chosen was the only factor involved in the fit.

Or like the knitter  who said she was searching for cotton yarn because her pattern called for cotton.  As if that was more important than the gauge recommended.

Gauge is all important.  Knowing how many inches around you want your sweater to be is a start. But you can only be sure that  your knitting will give you the correct number of inches IF you knit to the same gauge as the pattern gauge.

Think of gauge  - stitches to the inch - as the number of apples in a box.  The smaller the apples the more it takes to fill the box.  Conversely, the bigger the apples the  fewer it takes  to fill the box.  Apples in a box  -   stitches in an inch.  The smaller the stitches, the more you have in every  inch.

So how does this affect fit?  Well - you know how many inches around you want your sweater to be to fit you nicely because you measured a sweater that fits you nicely.   But you will only achieve that number of inches if your knitting gauge matches the pattern gauge.  If the pattern calls for 5 stitches to the inch, but you are knitting 4 or 6 or 3.5 or 8 or anything but 5 stitches to the inch, your knitting will not end up measuring the same  as the pattern.

To know if you are knitting the same number of stitches to the inch as the pattern recommends, you must DO A GAUGE SWATCH.  And the swatch must be large enough to be read-able - accurately read-able. Not like the knitter with a pattern that called for 11 stitches over two inches, so she cast on 11 stitches and knit two rows.   Really?  Do two rows of knitting in any way provide a good test for a sweater?  Are the same influences at play over 11 stitches as over an entire front or back of stitches? Of course not..

So here's my recommendation for a good gauge swatch.
Yarn and Needles:  Same as you intend to use for the sweater.

How Many Stitches??  Ten stitches more than the pattern gauge calls for.  If the pattern calls for 20 sts/4 inches, cast on 30 stitches.

How many rows?? Knit garter stitch for 4 rows.  Knit stockinet stitch for 40 rows, keeping the first and last three stitches of each row in garter stitch.  Finish the piece  with 4 rows of garter.  What you have created is a piece of knitting which will lie flat because of the garter stitch edges.  A nice flat piece of knitting allows for a nice accurate measurement to be taken.

Treatment:  Before measuring, wash the piece as the ball band on the yarn recommends.  Leave to dry.

Measuring:  One or two stitches into the stockinet section  from the left garter stitch edge, place a straight pin alongside a stitch.  From that pin, measure four inches across the piece and  insert another pin.  Count the stitches between the two pins.

Winner, Winner, Chicken Dinner???   If your stitch count, pin to pin, across four inches is the same as the pattern recommends - YIPPEE!  Start knitting your sweater.
If not, you will have to repeat the gauge swatch with a different needle size.  But how do you know whether to go up or down in needle size?  Well, back to our box of apples.  If there are fewer than 20 apples  in our four inch 'box' that means the apples  are too big to fit 20 of them into that box. We need smaller apples    stitches.  To get smaller stitches, use a smaller needle.  Perhaps the  opposite is the case and there are  more than 20  apples in  the box.   That means the apples   are too small.  You need bigger apples  stitches.  To get bigger   stitches, use  bigger needles.

All this info from the last few days, comes with a guarantee.  If you follow the measuring instructions, the tweaking instructions for waist, bust, belly and back variations, and the gauge instructions and still your sweater does not fit, here is my guarantee:  Grab your sweater, your yarn and your needles, get on a plane, train or automobile  and get yourself to my house.  We'll spend a weekend re-doing your sweater so it's perfect.  There will be refreshments and Fred will wait on us hand and foot so all we have to do is knit.
Friday, January 6, 2017

Gauge Delayed. Let's Talk Shoulders

Yesterday, after discussing lengthening or shortening your sweater and sleeves, shaping the waist and/or  bust or belly and  accommodating rounded backs, I mistakenly  thought,  "That's it!"  Nothing more to be finessed.  Then, I remembered shoulders.

Nothing bothers me more than sleeve/shoulder seams that do not sit precisely on the shoulder bone. Most likely, that bit of tailoring finesse harkens back to my high school, Home Ec classes.  In our final year, we tailored a suit and the teacher was a stickler for proper fit.  Sleeve/shoulder seams were one of her most emphasized, fit features.  She taught us that the shoulder of the seam that joins the sleeve to the body must  sit exactly on the shoulder bone. And so it should.

This potential, fit faux-pas only happens with garments that have set-in sleeves.  Personally, set-in sleeves are not my favourite style.  I think they make me look like a line backer. But from time to time, I do knit a sweater with that more tailored style.  More than from time to time it seems.
 The Patch Work sweater, worn yesterday.


 My own design with a contiguous shoulder.

 The Must Have Cardi

Graylina, knit during the 2014 Olympics

But always, I am very fussy about  the shoulder fit and make adjustments to the pattern to ensure that seam falls precisely on my shoulder bone.

How do I do that?  Well, first, I  make sure I know my shoulder measurement. (Notice a trend here in learning how to make sure your sweater fits?  Start by knowing to the partial inch what size you want to knit)  In the case of the shoulder, there is no ease involved as there is in the width/circumference of the garment. Without ease, I can measure myself instead of a garment.  My  shoulder width, bone to bone,  is 14 inches.

To account for the stretching that naturally takes place in a knitted garment, I use a slightly smaller number for the knitting of my shoulder width:  13 1/2 inches.  But how wide are the shoulders in the pattern?  Some patterns include a schematic or drawing with that number for easy cross referencing.  But if not - back to the calculator.

Patterns with set-in sleeves will have the knitter cast off stitches at the underarm, then decrease further stitches at each armhole edge as you knit towards the shoulder.  Take a look at the number of stitches remaining   after the decreases.  Divide that number by your gauge to determine how wide the shoulders are.  
For Example.  With a gauge of 5 sts per inch and 70 stitches left on the needles, the pattern in question calls for a shoulder width of 14 inches. (70 divided by 5).  Since I want a 13 1/2 inch shoulder width, I need a few more decreases.  In this case   half an inch would be 2 1/2 more stitches.  I would choose then to do either  one more decrease at each armhole for a total of two  - slightly less than needed -  or two more decreases at each side  for a total of four decreases.  My choice would depend partially on the wool being used.  Is it really stretchy?  If so I would chose four more decreases.  If not,  two stitches would probably suffice.  Either choice, easily done and you get a nicer fit.

Now for sure, Monday we talk gauge.  Because without the right gauge, none of this information matters.


Thursday, January 5, 2017

Accommodating Your Lumps And Bumps, Plus Length

At the risk of sounding very teacher-ish, (tell 'em what you are going to tell 'em, tell 'em, then tell 'em what you told 'em)  in this series of posts about fit, let me remind you of what we have done so far.

Wanting to knit a sweater that fits,  we measured a  sweater that fits.  How obvious is that? We then compared that finished measurement to the measurements for finished chest size as given in the pattern.  We also talked about how lucky it would be if the pattern had exactly our size but what to do if it didn't.

That knowledge in itself will give you a pretty darn-good fitting sweater.  But being the creator of your own sweater, you can make it even better.  You  can accommodate the dowager's hump, the big bust, the narrow waist, the big belly and shorter or longer garments.

Length is an easy adjustment.  Simply knit more or fewer rows/inches  than the pattern suggests. But I caution you - whether working on the sweater body or the sleeves, these adjustments MUST come prior to the armhole.  Recently, a friend was knitting a beautiful baby dress for her new grand daughter.  She had finished the front and showed it to me, saying " I wanted it longer so just knit an extra inch once I got to the bodice."  Oops.  That won't work.  The bodice contains the armhole. Extra length there would make a sleeveless garment baggy in the armhole.  And if there are sleeves to be fitted into that armhole ..... well, you can see, it won't work.  Any changes in length must happen before the armhole.

Now, what about those other lumps and bumps you might want to accommodate?   Let's look at  fitting the person with the rounded back.

Sweaters that are the same length in both  back and front will ride up in the back of a wearer with a rounded upper back.  The cure for this is more length in the back than in the front.  Knit a sweater that when worn,  appears to be  the same length for both front and back  but  when laid flat and measured, you see that the back is longer than the front.

How is that done, you ask?   Through short rows.  Short rows, worked only part way across the row will  lengthen the centre back while keeping the back, side seams the same length as those of the front.  Accurate seaming can still happen but at the same time, the sweater has extra length in the back.   The sweater currently on my needles

 has 3 sets of short rows across the back.  Two higher up in the shoulder area, and one set just above the bottom trim.

Waist shaping,  is also easy to accomplish.  A few inches before you reach the waist section of the sweater,   put a decrease just before  the side seam . Repeat this decrease every inch or so until you reach the waist.  Then reverse the process by increasing every inch or so.   And remember, there is no law that says you must have the same number of stitches at the hem of your sweater as at your bust. If you are large busted, keep increasing as you knit towards the bust, until you are happy with the measurement.

There is also no knitting law that says the back needs to be the same width as the front.  Knitters might find that increases done at the sides of  the front only are a great way to accommodate a larger bust without putting unwanted added fullness in the back of the sweater.

Knitters that need belly room will find that short  rows in the front do a great job of masking that 'pot'.  Or alternatively,  increases at the sides in the belly area of the sweater front will work as well.

As I have often told students,   "There are no knitting police."   You won't be ticketed for inserting your very own shaping elements.  Just because the designer doesn't mention waist shaping, or belly/bust room or accommodating the rounded back doesn't mean you cant incorporate these features in your sweater.  After all, it is you or your loved one who will wear the sweater. Not the designer.

So far, I've talked about shaping as it relates to  the pattern.  But there is still the issue of whether the knitter can pull off the vision.  And that has to do with GAUGE.  Tomorrow's story.

Wednesday, January 4, 2017

Measurements Taken. Now What

The process to make  a sweater that fits is easier than most knitters might think.  Starting with the measurements from  a finished, favourite-fitting garment,  the knitter is armed with  Tool Number One to knit the correct size sweater.

Please note the word FINISHED. That is the  measurement you are looking for.   Some patterns give more than one chest measurement.  The pattern might give  a To Fit Chest Size measurement as well as a FINISHED chest measurement.  You measured a FINISHED sweater, so you are  looking for the FINISHED chest size measurement to start your work.

The difference between the To Fit Chest Size... measurement and the FINISHED chest measurement is the amount of ease the pattern is suggesting for the sweater.

I have a funny story about ease.  When teaching my 'fit' class one year, two friends came together  to take the class. These ladies were, as my Mother would have said, Mutt and Jeff. That is, one quite chubby and the other quite thin.  They provided the perfect example of why it is important to measure a sweater and not yourself.

Both ladies had brought red sweaters to class to be measured.  Miss Chubby's favourite-fitting, red  sweater measured a  figure-hugging 44 inches.   Showed off her curves.  Miss Thin's  red sweater  also measured 44 inches.  It fit like a Mu Mu.   Remember these were their favourite-fits.  These two ladies, with vastly different sizes and figures wore the same size!  That is how they liked to dress.  If they had chosen to knit the To Fit Chest Size  in their pattern, they both would have been disappointed in the fit of their sweater.  You measure a FINISHED sweater and you chose the FINISHED chest size from the pattern that is closest to your sweater measurement.  Digression complete.

 If you want to knit a 40 inch sweater and the pattern has a 40"  FINISHED chest size, you are  in luck.  Simply knit that size. But if the FINISHED chest sizes in the pattern run differently - say 30,34,38,42,46,50" to  knit a 40 inch chest, then you need to go back to the calculator.

My method is to look at the difference in cast-on numbers for the two sizes on either side of my 40 inches.  What is the difference between those  cast on numbers?

For example if size 38 calls for a cast on of 95 and size 42 calls for a cast on of 105, the difference is ten stitches.  Since 40 is half way between 38 and 42, I can easily calculate the half way mark between 95 and 105 and cast on 100 stitches.  AND - carry on with the half-way numbers all the way through the pattern.

For example, if the pattern tells you to cast off 4 stitches at the underarm for size 38 but 6 stitches for size 42 size 40 would be a cast off of 5 stitches.  Half way.

And to paraphrase Elizabeth Zimmermann, - One stitch either way won't make or break a sweater.

Length, of course is a different.  Tomorrow's story.


Tuesday, January 3, 2017

Nice To Be Back

Yesterday, after posting, I received a cheery comment from my friend Vera welcoming me back to the world of blogging.  Thanks, Vera.  Vera's words have given me the idea for the next few  posts.  

In her comment, Vera mentioned that she is often disappointed with the fit when she knits a sweater for herself.  I have certainly heard that complaint from many knitters. Many knitters are afraid a sweater won't fit, or will be too hard to knit to fit, or have tried and failed to knit a sweater that fits. As a result,  they never knit sweaters for themselves.

Instead they limit themselves to knitting  shawls, scarves and other one-size-fits-all items. Or they knit for babies and children and often claim - "It will fit someone."

But knitting, by its very nature is a creative process.  When doing something creative, why limit yourself?   Especially when learning to knit something that fits is pretty darn easy.

When I worked in a yarn store, knitters  would often  come in with a pattern and ask "How much yarn do I need to  knit this sweater?"

To narrow down the options, I would ask "Well, what size are you going to knit?"

More often than not the customer would reply" Oh, I always knit a large." Or small or medium as the case might be.  Well, those terms didn't tell me much. A  class about sizing was needed.

I would start  each class by asking the students "Who here knits a 'Medium' when knitting a sweater for themselves?"    Hands would go up.
I would  then hand out a variety of patterns and ask the students one by one to state the finished bust size of the 'Medium' on their pattern.  

Those dimensions would often vary by several inches.
Knit to Fit - Lesson Number One: Never chose a size  based on  ambiguous  terms like small, medium or large.  Size needs to be described in detail  -  inches or centimetres.

 But,  then of course, the knitter still needs to know which size to choose.  How do we know that?  We measure.  Not ourselves, as many knitters think, but instead, our sweaters.  Hand knit or commercially made, doesn't matter.  What does matter is the style of the sweater.  If you plan to knit a winter cardigan, don't measure a tank top.  Find a sweater that   fits the way you like,  is a similar type/style to what you want to knit, then measure it.

But, where do we measure?   Width/circumference is measured across the front or back of the sweater, armpit to armpit.

Whatever that width may be, double it for the circumference of your sweater  After all, the sweater needs both back and front.  


Length is measured from where the shoulder meets the neck trim down to the bottom of the sweater


while sleeve length is measured from where the sleeve meets the armpit to the cuff.


You now have three measurements.  Stick with me over the next few days and I will tell you how to use those measurements to knit to fit.


Monday, January 2, 2017

Happy New Year

Well, hello there.  Several months have passed since I  last posted, and you might be wondering 'Who the heck is this?'

It's me.  After a long hiatus,  pleas from a few of my faithful readers and learning that a brand new knitter was looking for my blog, made me decide  to start 2017 off with the resolution to post regularly.  Well, at least more regularly.  We leave next week for two months in Florida, which could put an end to my good intentions.   Finding time to post when the beach beckons?  We'll see.  But for now, I'm home, it's cold outside, so posting will happen.

What is on my needles?  2017 begins the way 2016 ended.  That is, with the same sweater on my needles. Like every cold Canadian, I have a wear-around-the-house sweater.  The one I currently wear, I knit, a few years ago.  I wear it almost daily once the temperatures drop and it is starting to look less than nice.  Enough motivation for me to knit a new around-the-house sweater.

What should I knit?  A cardigan, so I can throw it on over whatever not-warm-enough clothes I am wearing  on any given day.  Top down, so I can design on the fly and knit to fit.  

Into the stash I dove and came up with 6 balls of wool snatched form Sandy's sister Sue's most recent yarn give-away.  4 balls of Patons Classic tweed in taupe and off white, along with two balls of co-ordinating plains - one taupe and one in a shade of white.  The three colours  went well together but when I really looked at them, I realized it would be a pretty dull   sweater in those colours alone.  Not the greatest look for a Canadian winter.  We need bright and cheerful here in these northern climes to get us through some pretty  short,  dark days.

Back to the stash and it didn't take long to come up with several small balls of wildly bright and exciting colours.  Perfect.  Close to the face, a cheery, coloured yoke in garter stitch, followed by  the body and sleeves in the 'dulls'.  And this would also solve the problem of a potential yarn shortage.  I was pretty sure the 6 balls would suffice, but you never know.  With the colours added at the yoke and cuffs, I am confident I will not run out of yarn.

As always for me, when I knit pattern free, I make several starts.  Getting the colours lined up 'just right', getting the raglan increases ' just right',  getting the front neck increases 'just right' all took some ripping and re-starting.  Perhaps the equivalent of re-knitting a third of a sweater.  Without that I would most likely be finished by now.  Instead, here I am.


Below you can clearly see the steek stitches in centre front.  During the planning stage,  I tossed around the idea of knitting back and forth so there would be no need to steek  versus knitting in the round so there would be no need to purl. The latter won.  

This morning finds me with 15 1/2 completed inches. Five more inches to go before the ribbing. Then sleeves, and steek.   Let's see how far I can get before Florida.  This wool sweater is not invited down south.  If not complete before departure, it will go into hibernation until spring.