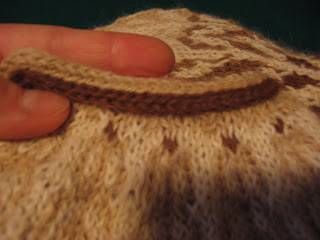
But done and almost dry from blocking, I love it. Here are the details.
Elizabeth Zimmermann's 50th Anniversary Cardigan.
Yarn - Alpaquita. Peruvian Alpaca purchased at the KW Knitters Fair, Sept 2008. Only two years on the shelf! Although, all the garments this vendor had on display were beautifully knit with no snagged, split stitches I found the yarn to be ornery. It split easily and shows every messy stitch. I am counting on blocking and gravity to fix my sloppy knitting.
Needles- After much trial and disappointment of sleeve beginnings I settled on 4mm.
The ball band gave no suggested needle size, but to me the yarn looked best at about a DK gauge. With the 4mm needles, I achieved about 24 stitches over 4 inches.
Method - This sweater is knit in the round and later steeked. I knit the sleeves first , then started the body. Once the body and sleeves were joined, I knit for about 4 inches before starting the yoke pattern. Being short, I prefer patterned yokes that start higher up the chest. Following EZ's guiding light, I learned that the yoke depth is about 1/4 of the sweater circumference. For me that meant 10 inches.
Relating that 10 inch bit of information to my gauge and then to the yoke chart, I realized I could remove some of the chart rows and fit the yoke into a shorter space, thus starting it further up the chest for the look I wanted. Thank you Elizabeth.
The most pleasing part of this yoke pattern - for me - was the reverse nature of the colouring. Most often, it seems, in yoke-patterned sweaters, the main colour remains the same as you near the neck, while the pattern colours change. This chart does the opposite. The pattern remains the same, while the background colour changes.
I chose the off white - the lightest of my colours - for the pattern work and you can see the background colour change from the darker body colour through a mid brown, and finally to a lighter beige. Bordered by my choice of red for the 'optional' colour row at the beginning of the chart. We're talking art here, people!
The bottom of the sweater and the sleeves are 2 x 2 ribbing for about 2 1/2 inches, but that is the only ribbing. The front edges and neck are bordered with two rows of I-Cord. The first row is the same colour as the body while the second row was done in a lighter tone. I am not sure that was the right choice. Being afraid of my efforts to achieve neat I-Cord trim, I chose the body colour for the first row. Less likely to show blips, but definitely, it turns out, less likely to be seen at all. It shows up nicely around the neck though.
The button holes are invisible. They sit between the two rows of I-Cord and are done by simply not attaching the I-Cord for the distance of two stitches.
Steeking was easy - just one steek running up the centre front. I allowed for the steek by knitting an extra 5 stitches at centre front. At some point in my knitting life, I had heard that seed stitch was a good steek stitch, so seed stitch it was. At cutting time, however, I decided to try a crocheted steek. I REALLY like the crocheted steek - it becomes it's own cut-ends hider -
but would have been much easier to work on stockinet stitch. Next time.
The underarms were grafted. And if you know a knitter that can do this type of sleeve join without a tiny hole at each end I'd like to meet her/him. Not really. I'd rather not. But I followed Deb Gemmell's tip to close those pesky holes with what she calls a 'purse-string' closure. Simply skim the yarn in a circle around the hole and pull tightly. Like closing those little cloth purses some of us had as kids. Dead easy and it looks good.
Lastly, a poor, self-portrait shot. The photographer is fishing. When will that run end? Perhaps better pictures another time.


7 comments:
That looks nice and warm and well done. Looking forward to a better picture! I wish I had half of your talent ☺
Gorgeous!
Brenda, it looks wonderful! I hope your photographer comes back with a tasty catch...and takes more pictures!
love the trick for closing up the holes - Deb continues to be a genius...
Love the look of the sweater - just makes me want to make it, and i have the patern - must stash dive for soemthing appropriate...
It really is gorgeous. It didn't really take you long at all. Thanks for all the tips.
What a nice, meaty, detail laden, satisfying FO post!
I am so intrigued with your modifications to the length of the patterning at the yoke! Brilliant!
I do hope your fisherman will oblige us with a few more modeled shots!
The sweater looks wonderful, I can hardly wait to see it. You're bringing it to knit group right?
Post a Comment